Getting out on a boat and exploring our fantastic waterways is incredible, but boat issues can quickly turn a great trip sour. That’s why it’s essential to have a reliable and safe vessel. While sometimes things can go wrong, this article aims to equip you with self-maintenance tips to prolong the life of your boat and help ensure confidence in your vessel for days out and trips away.
Pre-Trip Checks
I’ll cover safety equipment in another article, but checking it is crucial before heading out on the water. Aside from safety gear, here are some other key checks to keep your vessel in working order:
Inspect for Damage: Visually inspect your boat for any damage that may have occurred on your last trip. If there’s structural damage to the hull, have it checked by a local boat mechanic.
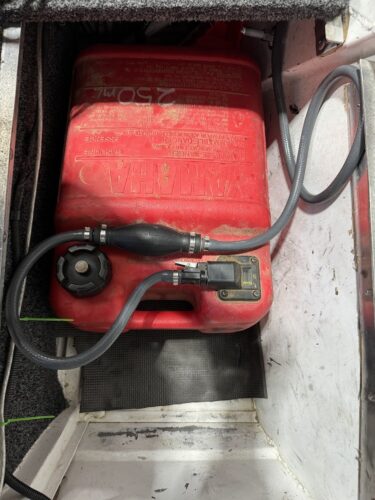
Check Fuel Lines and Tank: Inspect fuel lines and the fuel tank for any signs of leakage. Fuel leaks are extremely dangerous, so if you notice any leaking or pooling, replace the lines or tank immediately. If your boat has been stored for a while, old fuel can damage the motor. Disconnect the fuel line, safely discard the old fuel, and refill with fresh fuel.
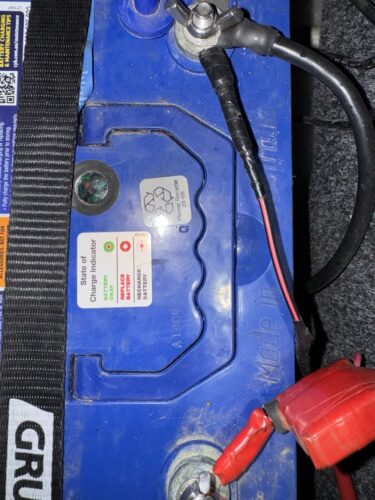
Check the Battery: Inspect your batteries and check the voltage if you’re able. The reading should not be lower than 12.6V. If your battery has an indicator, it will let you know if it needs charging or replacing. It’s best to fully charge your battery before any trip with a 240V charger. Also, inspect the terminals—they should be gray with no visible corrosion. If dirty, remove any wiring, lightly sand the terminals, and spray them with an anti-corrosion spray from an auto store. Replace the battery if you notice any leaks or misshaping.
Test Electronics: Once your battery is safe, test your boat’s electronics, especially lights and gauges. If any electronics aren’t working, retrace the wiring and check for an inline fuse you could replace. Always use the same amperage fuse as the original. If in doubt, take it to a professional in 12V systems for a check-up.
Check Ropes and Straps: Inspect all ropes and tie-down straps for any damage. Frayed or torn straps compromise integrity and should be replaced, as should damaged winches on trailers. I’ve had a winch snap at the ramp, which isn’t fun, so check your winch strap or rope for damage.
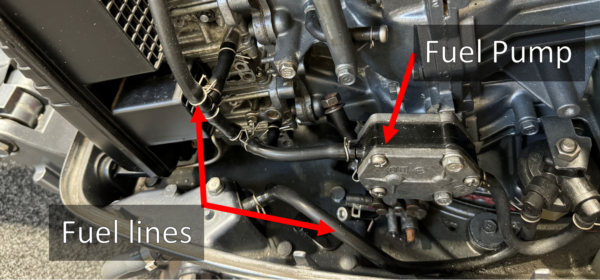
Inspect the Motor: Remove the cowling and check for any visible signs of leaking oil or fuel. Some oily residue is normal, but there shouldn’t be any drips. Check the motor’s leg and propeller area for oil leaks, especially around the propeller; if you see oil, take your boat in for service as fishing line can damage propeller seals.
Check the Propeller: Some wear and tear on the propeller is normal, but bent blades or missing chunks will cause vibration and poor performance. Ensure tilt, trim, and steering work smoothly and aren’t stiff.
Check the Bung: Inspect the bung and surrounding area for damage. Ensure the thread is intact, and the rubber O-ring isn’t damaged. I always keep a spare bung.
Inspect the Trailer: Ensure trailer lights work, bolts and nuts are tight, and there’s no visible grease around the wheel hubs. Check that wheel nuts are tight, and the spare tire is inflated.
These pre-trip checks will make you feel safer and more confident in your boat so you can focus on the fishing.
While en route to your destination, I recommend checking the trailer wheel hubs at some point, especially on a long trip. When you arrive at the ramp, touch the center of the wheel. It may be warm, but it shouldn’t be too hot. If it is, the bearings likely need replacing. This simple check can prevent a wheel from falling off on the highway. I also check my straps along the way.
Post-Trip Maintenance
Flushing the Motor
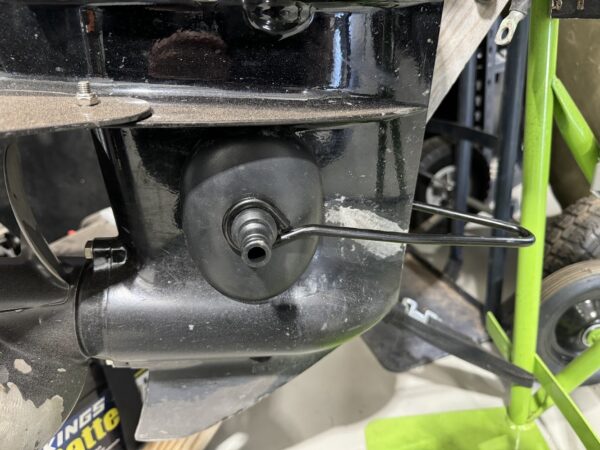
Flushing your motor is a must. Most motors are water-cooled. This means they suck water up from the leg and pump it around the motor. If you are fishing in saltwater, this means you have salt in that system. Some motors are fancy and have a hose connection for this, but if you’ve got a simple outboard like me, you will need a set of what are called ear muffs (no, these are not for the noisy two-banger). They are available at most boating stores; however, I have found some models seal a lot better. The oval-shaped muffs seem to work best for me, whereas the rectangles are not as good.
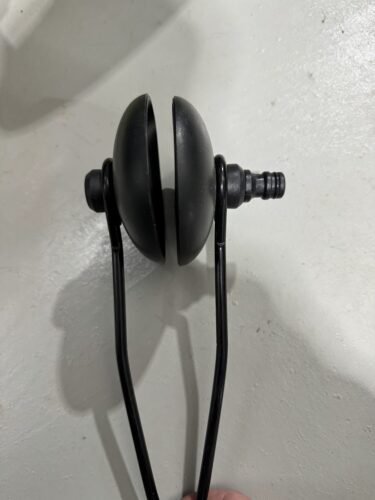
At the bottom of the outboard leg, you will see two vents. They are the same on both sides and are usually plastic. Slide the ear muffs on, from the front so they are not near the propeller, and ensure they fully cover the vents.
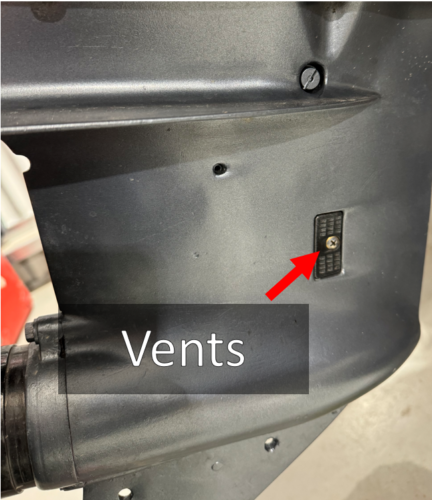
Press on them to try to establish a seal. When you have them in place, connect the hose and turn on the tap to full pressure. It is normal for water to come out around the ear muffs. Start the motor.
Once started, check for water coming from what’s called the tell-tale, a small hose that spits water out below the cowling, at the top of the leg. Sometimes this can take a up to 30 seconds to start. If you don’t see water coming from the tell-tale, stop the motor, adjust the muffs and try again. Do not let the motor keep running for extended time without water from the tell-tale, it may cause the motor to get hot and cause damage. If you can, putting the motor in a tank, or a well-placed wheelie bin, works better than using muffs and may solve the issue.
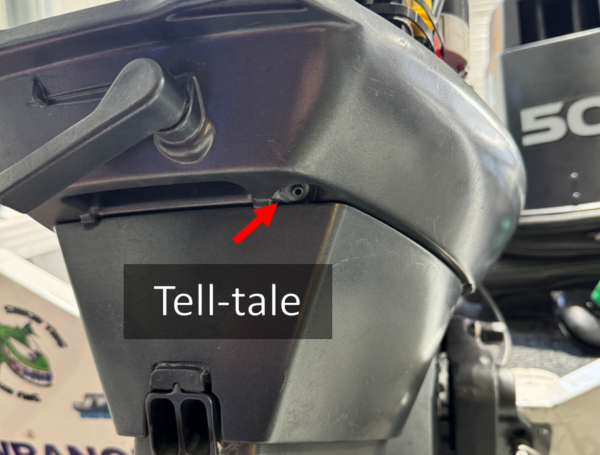
Once the motor is running, let it flush for a few minutes to ensure all saltwater is cleared from the system. This will help prevent the salt from building up and causing blockages or corrosion in the motor’s cooling system.
Final Steps
Charge your batteries if needed, as they don’t like to be stored flat. If you’re storing the boat for a while, disconnect the fuel and plan to use fresh fuel next time.
It’s recommended to have your boat serviced annually to keep it reliable, but these simple steps will go a long way toward ensuring your safety and enjoyment on the water.
With these simple steps, you’ll ensure your boat stays in top condition for the next trip and avoid costly repairs down the track.
Happy boating,
Crackers
To learn more about boating, head to Better Boating Victoria.

